Version 5.0

Contents
- Using GoSatWatch for the first time
- Map View
- Sky View
- Time Control
- Passes View
- Pass Alerts and Notifications
- Satellite Selection
- Settings
- Adding Satellites
Using GoSatWatch for the first time
To get the most out of the app,
GoSatWatch needs to know your viewing location and have network access
to download the latest orbital data. By default GoSatWatch will attempt
to automatically determine your location and download the latest
satellite data when you first start the app. You can refresh the orbital
data at any time from the Satellites tab by tapping the refresh button
in the top right corner.
If your location cannot be determined you will be prompted to set your location.
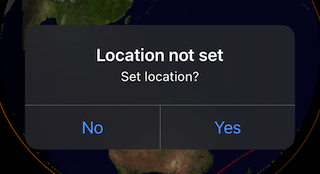
Setting your location is required for
the correct sky display and for pass predictions. Tapping [Yes] will
show the location entry screen. If you select [No] you can still enter
your location at a later time under settings.
On the location entry screen you have several options to enter your location:
- Tap the [Current Location] to automatically find your location using iPhone location.
- Tap the [City] button to select from a list of cities.
- Manually enter the latitude and longitude for your location.
Using iPhone location or manually
entering the latitude and longitude will give you greater accuracy in
location and pass predictions than selecting from the city list.
Tap the location name to edit or enter a custom name for your location.
Tap [Save] to set the location.
Map View
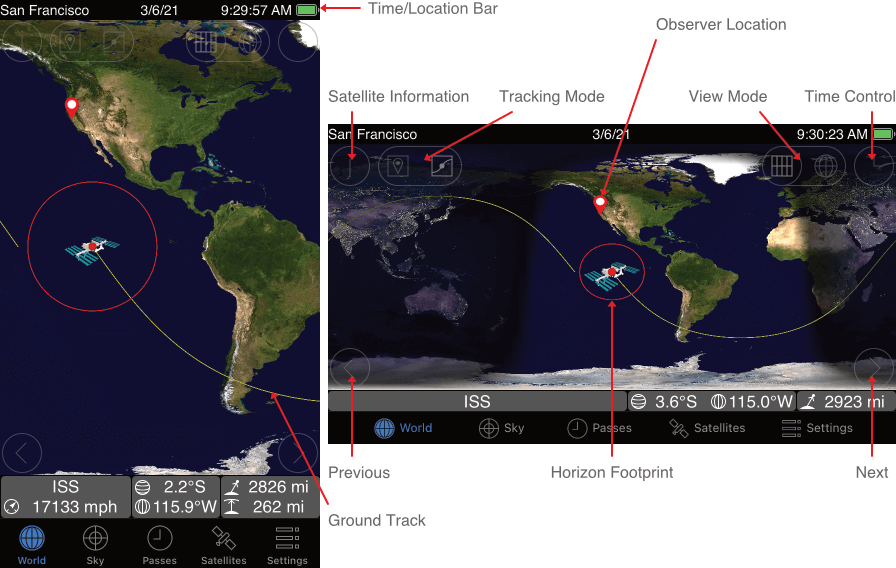
The map view shows satellites and the
orbit path for the currently selected satellite on a world map. Tap the
World tab to switch between a 3D globe view and the map view.
The yellow orbit path is shown for the
time it takes the satellite to do one complete orbit of the earth. The
path is darker where the satellite will be in the earth’s shadow.
The red line around the selected satellite is the footprint area at which the satellite is above the horizon.
- Touch and drag to move the map.
- Touch a satellite to display it’s orbital path and information.
- Touch the left and right arrows to step through the enabled satellites.
- Touch the clock button to open the time control. See Time Control.
- Pinch to zoom in and out.
By default the selected satellite will
be centered on the screen with the map moving below. Dragging the map
will fix the map at the selected position with the satellite moving over
the map.
Double touch the screen to center around your viewing location.
Touch the info panel to center around the selected satellite.
The following information is displayed in the Map view:

Speed

Latitude

Longitude

Range from observer position to satellite

Altitude
In landscape orientation the satellite’s speed and altitude is not shown.
Sky View
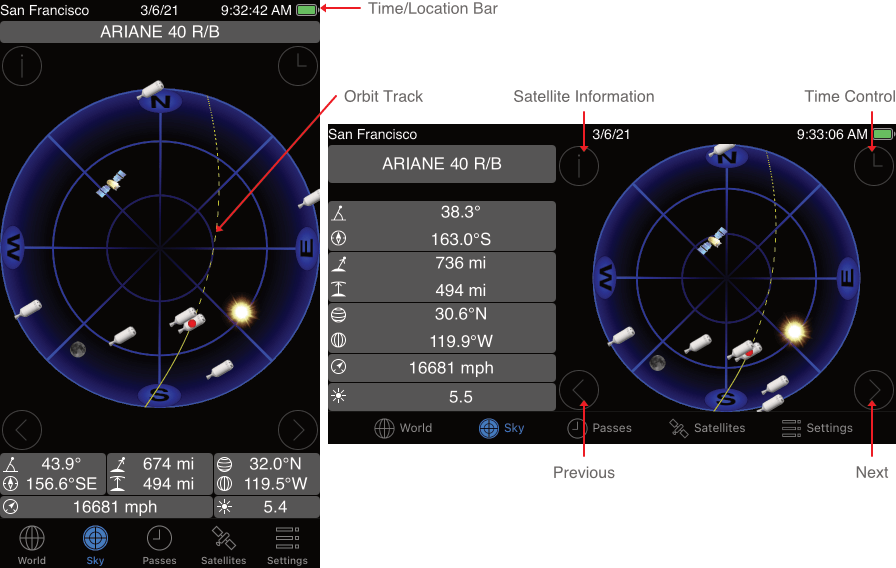
The sky view shows the satellites above the horizon for the selected viewing location.
The elevation rings are shown for
elevations of 0, 30 and 60 degrees with the center being the point
directly above you and the outer ring for along the horizon. Satellites
in the shaded area have an elevation of less than 10 degrees and
generally cannot be seen due to atmospheric effects and distance.
Touching a satellite will show the satellite’s track and orbit information.
The satellites sky track is shown as a
yellow line. The dashed line is where the satellite has been and a solid
line is where the satellite is going. The track line is shaded where
the satellite is in the earth’s shadow.
For devices with a compass enabled the sky view will automatically rotate to the compass direction. If the compass is disabled, double tap to return to the default north-south view.

Hold so that the back points to the sky to start motion control. For devices without a compass rotate like a steering wheel to adjust the viewing direction.
In addition to the information shown in the map view, the following is shown in the Sky view:

Elevation from horizon

Azimuth direction

Satellite brightness magnitude (“–” when satellite is not visible)
As with the map view you have the next, previous and time control buttons.
Touch the information panel to center the view on the selected satellite.
Touch drag to change the view direction. Pinch to zoom in and out. Double touch to return to the full sky view.
Time Control
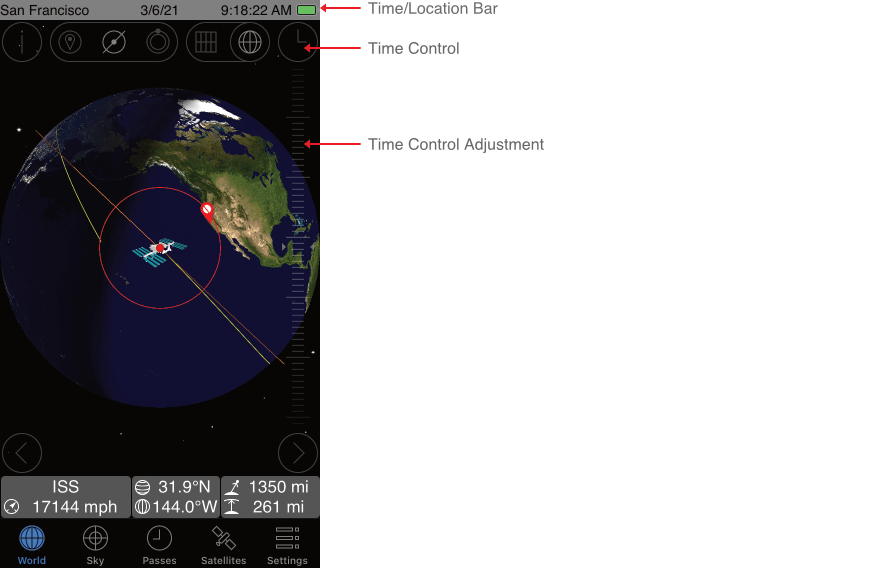
The time control is available in the map and sky views. Time control enables you to go forward or backward in time.
Touching the time control button reveals
the time control. Slide the control down or up to move forward or
backwards in time. Flick the control for time lapse animation. The time
and location bar at the top of the display will highlight to show that
the time has changed from the current time.
Tap the time control button to hide the time control and return to the current time. The time and location bar will unhighlight.
The animation performance degrades with
the number of satellites shown due to the increase in number of orbital
calculations required to update the display. Deselect satellites that
are not of immediate interest to improve animation performance.
A satellite will not be shown if the time is set before the point the satellite data becomes valid.
Passes View
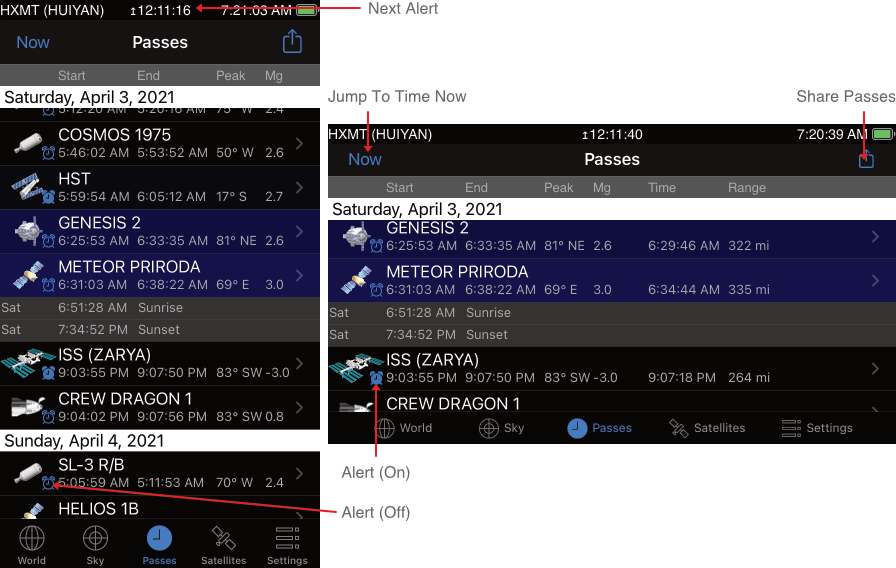
The passes view calculates the passes
for the selected viewing location. GoSatWatch can either calculate when
satellites can be visible from sunset to sunrise, or all passes over a
24 hour period.
The list automatically advances to the
current or next satellite that will appear for the current time.
Highlighted passes are for satellites with an elevation currently above
the horizon.
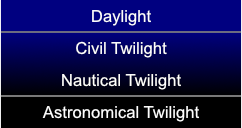
The background color represents how dark the sky will be during the pass. Blue during daylight when the sun is above the horizon. During daylight satellites will not be visible. Darkening shades of blue corresponding to the degree of darkness when the sun is between the horizon and 12° below the horizon (civil and nautical twilight). During this time it may not be possible to see satellites. Black when the sun is 12° or more below the horizon (astronomical twilight) dark enough to see satellites at the estimated brightness.
The following information is given for each pass:
Start time – The point at which the satellite becomes visible.
End time – The point at which the satellite is no longer visible.
Peak Elevation – The elevation the satellite will be at the peak time.
Peak Azimuth Direction – The azimuth (N, S, E, W) the satellite will be at the peak time.
Magnitude – The estimated brightness of the satellite at the peak time.
Peak time* – The highest visible point the satellite will reach.
Peak Range* – The closest distance the satellite will be.
* Peak Time and Peak Range are only shown in landscape orientation.
You can select to show times in either
12 or 24 hour format from the Apple general settings. Go to Settings
-> General -> Date & Time -> 24-Hour Time.
To show times in GMT add a location favourite and set the time zone to GMT.
Tapping on a pass displays the sky track
for the pass, the starting, end and maximum elevation times with
directions for the pass. A dashed path is shown if the satellite has
already passed. The satellite sky position is shown if the satellite is
currently above the horizon.

Information displayed:

Rising elevation, direction and time

Transit elevation, direction and time

Setting elevation , direction and time
In visual passes only mode it is not
uncommon for the peak time to be the same as either the start or end
times due to the satellite entering or exiting the earth’s shadow before
reaching it’s maximum elevation.
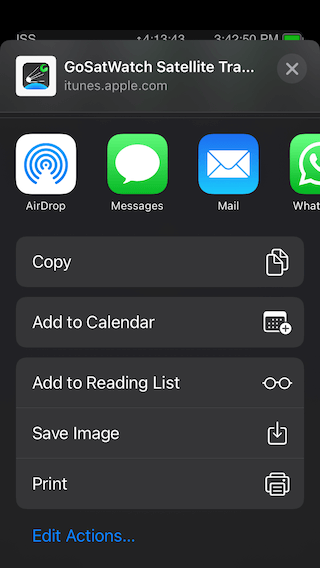
Tap the share button to share the passes to E-mail, Messages or social media. From the pass details you can also add the pass to the calendar.
Pass Alerts and Notifications
Pass alerts can be selected by tapping
the satellite icon next to a pass. An alert indication is shown when an
alert is enabled for that pass. Tapping the icon again will clear the
alert. You can select if alerts are set for all passes by default from
the preference settings.
All alerts are reset when passes are
recalculated. Passes will be cleared when the satellite data is
refreshed, satellite selection changed or the settings are changed.
Select Passes again to re-calculate the pass predictions.
The next alert pass will be shown in the
status bar giving the satellite name and the countdown time to the
start of the pass. The alert status bar will flash and optionally chime a
predetermined time before the pass begins. The warning time can be
selected in the preference settings.
Notifications can be optionally enabled to show alerts even when the app is not active. Up to 64 notifications from the passes list can be enabled. Notifications are cleared each time the app is started again. The next notification alert will be for the next satellite pass shown in the status bar.
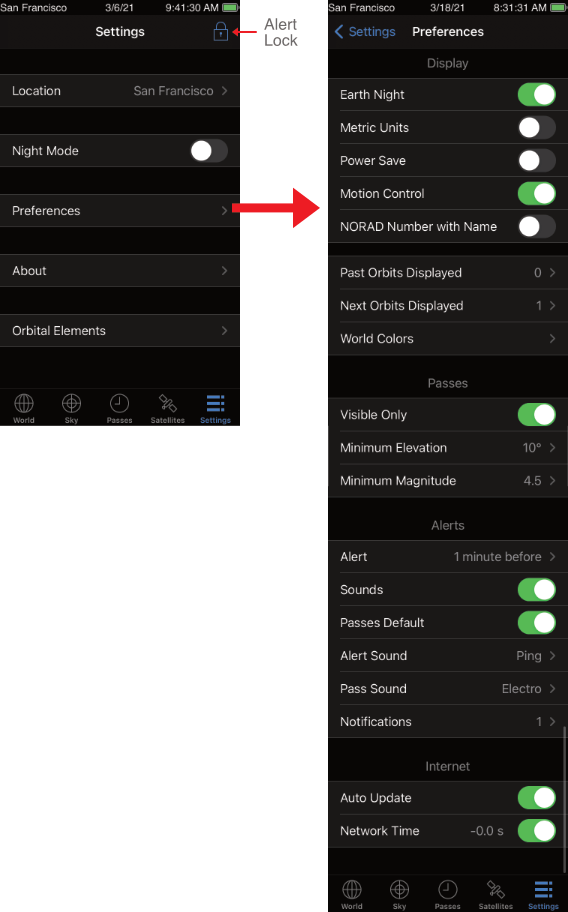
An alert lock screen accessible from the settings can be used to keep the app active while minimizing power usage. See the settings section for more details.
Satellite Selection
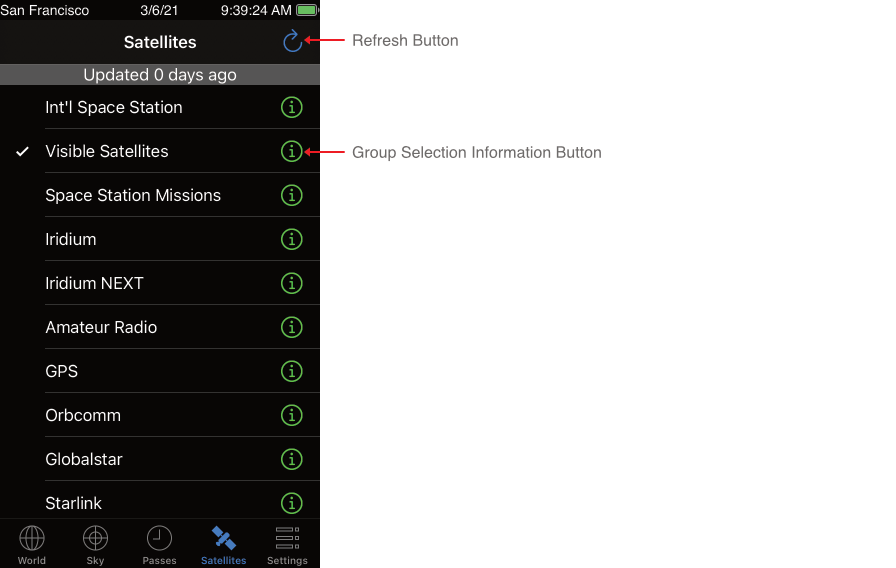
The satellites screen selects which satellites are displayed in the map and sky views and used in pass predictions.
Satellites are grouped into satellites
sets. Tapping on each set enables and disables those satellites from the
display and pass predictions. A check mark appears to the left of each
set to indicate whether the set is selected.
Touch the refresh button in the upper right corner to download updates from the internet for the satellite orbital data. The buttons to the right of each set animate while data is being downloaded. The color of the button indicates the status of the update for each set.

Green – Successful update. Orbital data was successfully updated for one or more satellites.

Yellow – A connection was established with the data source but didn’t contain any orbital data.

Red – A connection to the data source could not be established. Your internet link may be down, the data source server may be down, or the orbital data may no longer be available. If the problem persists check the data source’s URL with a web browser.
Tapping the button will display a list of one or more satellites for the set. Here you can enable and search for individual satellites. The status title shows the result for the most recent update attempt.

A check mark shows which satellites are selected for that set.
The number to right of the satellite name is how old the orbital data is in days.
Use the [Select All] / [Unselect All] to select or deselect all the satellites at once.
Use the search bar to find and filter on a subset of satellites that are of interest to you.

Tap on the right button to display the orbital data for that satellite.
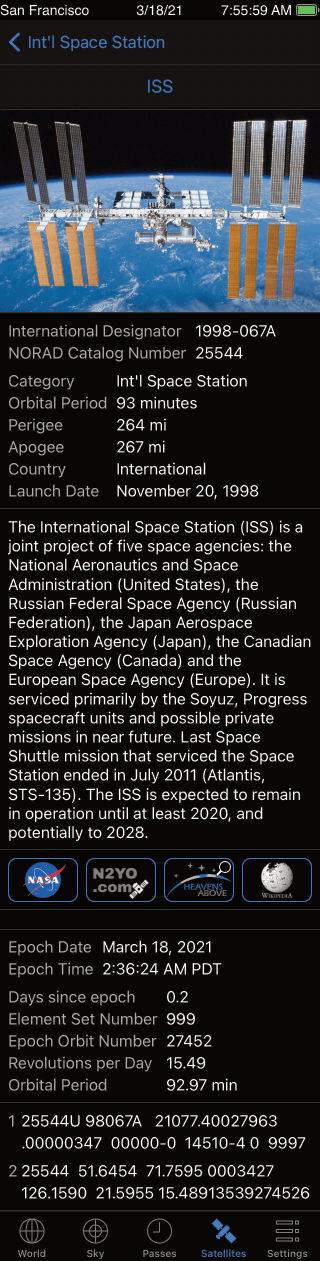
The following orbital information is shown:
Catalog number – The NORAD catalog number for the satellite.
Launch year – The year the satellite was launched.
Launch number – The launch number for the year.
Launch piece* – A designation for the piece of a single launch. A launch typically will result in several satellites fragments including the rocket booster segment and one or more satellites.
Epoch – This is the time at which the orbital data becomes valid.
Days since epoch – The age in days of the data since epoch.
Element set number – A number that is usually increment for each update that is made available.
Orbit number at epoch – The number of times the satellite has orbited the earth.
Revolutions per day – How many times a day the satellite orbits the earth.
Orbital period – How long it takes the satellite to orbit the earth.
The data is followed by the Two Line
Element (TLE) set data. This is the actual raw data that is downloaded
from the internet that contains all the orbital data required to
calculate the position and make pass predictions for a satellite.
For the international space station (ISS) may see multiple orbital data sets. Each set corresponds to an orbital adjustment. Spacecraft en-route to the ISS will typically go through several maneuvers to close in and dock with the space station. The space station undergoes periodic boosts to maintain an operational altitude. GoSatWatch will automatically select the one to use for the desired time period when making pass predictions and calculating satellite positions.
The satellite name can by changed by tapping on the satellite name.
Settings
The settings tab allows you to configure GoSatWatch.
Settings – Alert Lock
The alert lock opens a lock screen showing the next alert pass if any and the countdown time to the pass. A chime will sound a set time before the pass begins and the screen will flash leading up to the start and through the duration of the pass.
The alert lock screen disables the power save so that the app remains active for alerts to be given while minimizing power usage. Be aware that this consumes the battery power at a higher than normal rate. For a fully charged device there is enough battery power for approximately 4-5 hours for an iPod touch and 8-11 hours for an iPhone depending on the model, time since the last charge and the age of the battery.
Use the slider control at the bottom of the screen to unlock and return to the settings.
Settings – Night Mode

Night mode displays the main screens in shades of red to help preserve night vision.
Settings – Preferences
Settings – Preferences – Display – Earth Night

Selects the earth night lights in the World views. Turn this option off to improve performance on older devices.
Settings – Preferences – Display – Metric Units

Selects whether to display speed and distances in kilometres or miles.
Settings – Preferences – Display – Power Save

Turning the power save on enables the iPhone auto off timer and reduces the tracking updates to once every second. Take care when turning off power save to remember to either re-enable power save or exit the app when you are done to prevent the batteries from being discharged.
Settings – Preferences – Display – Motion Control

* This option is only available in devices with an electronic compass or gyroscope.
When enabled the sky view is automatically rotated to the compass direction. When disabled the sky view can be manually rotated by touch dragging. Double tap the sky view to return to the default north-south direction.
Settings – Preferences – Display – NORAD Number with Name

Selects whether to show the NORAD ID with the satellite name. Can be used to search on NORAD ID in satellite groups.
Settings – Preferences – Display – Past Orbits Displayed

Selects the number of previous orbit
tracks to be shown for the selected satellite in the map view. Past
orbits are shown as a dashed line.
Settings – Preferences – Display – Next Orbits Displayed

Selects the number of next orbits tracks
to be shown for the selected satellite in the map view. The track is
shown as a solid line.
Settings – Preferences – Display – World Colors

Selects the color for the satellite ground track, footprint, orbit and position in the world view.
Settings – Preferences – Passes – Visible Only

Selects whether to predict all passes over a 24 hour period or only visible passes. For a pass to be a visible pass the satellite must be in the sun at some point along the pass during night time.
Settings – Preferences – Passes – Minimum Elevation

Determines the minimum elevation a satellite must reach to be included in the pass predictions. Most satellites cannot be seen below 10 degrees due to the distance to the satellite and atmospheric effects.
Settings – Preferences – Passes – Minimum Magnitude

Determines the minimum visual brightness a satellite must reach to be included in the visible pass predictions. The magnitude range can be set between 0.0 (brightest) and 6.5 (faintest) with off allowing all predictions regardless of magnitude. A magnitude of 6.5 is the limit the unaided human eye can see under ideal viewing conditions. Visibility is often limited to a magnitude of 4.5 in urban areas due to light pollution.
Note the magnitude limit is not applied when 24 hour pass predictions mode is enabled.
Settings – Preferences – Alerts – Alert

Determines the time an alert is given before a satellite pass begins. A time between zero and 30 minutes can be selected.
Settings – Preferences – Alerts – Sound

Selects whether a sound is made on a pass alert. This applies to both the alert and pass sounds. A sound will always be made when the alert lock screen is active.
Settings – Preferences – Alerts – Passes Default

Selects the default alert indication given to each pass when the passes are first calculated. Once passes are calculated the alert indication is not changed by this setting until the passes are recalculated. Individual satellites can be manually selected on the passes screen by tapping the satellite icon next to each pass.
Settings – Preferences – Alerts – Alert Sound

Selects the sound at the time set in the Alert preference before the pass begins.
Settings – Preferences – Alerts – Pass Sound

Selects the sound for when the pass begins.
Settings – Preferences – Alerts – Notifications

Selects the maximum number of notifications alerts the app will show when the app is no longer active. Notifications are cleared when the app is started again and reset when pass predictions are re-calculated. Set to Off to disable notification alerts.
Settings – Preferences – Satellites – Auto Update

Set ON to automatically download and update the satellite orbital data from the internet each time the app is started. Note that this will also clear any previous pass predictions.
Settings – Preferences – Satellites – Network Time

Enables NTP time synchronization to correct for time differences between the device time and the true time for greater tracking accuracy. Requires an active internet connection. The value shown is the time difference. Tapping the area will re-do the time synchronization. If no NTP server can be reached the last successful time offset is shown in red. An additional NTP server can be set through the Apple Settings app > GoSatWatch > ADDITIONAL NTP SERVER.
For the more recent Apple devices iOS automatically performs time synchronization with your service provider and the difference will be negligible.
Settings – Location

Tapping on Location shows a list of user
configured locations. Select “Current Location” to attempt to
automatically determine you current location.
Use this screen to switch between commonly used locations.
Touch [Edit] to add to, remove, or
re-order the list of locations. When in editing mode, touching a
location opens the location edit screen.
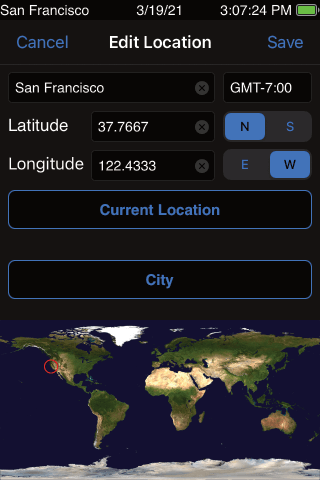
You have several options on how to set or edit your location:
- Touching the [Current Location] uses iPhone location to attempt to find the latitude, longitude and name for the location. This will update the latitude and longitude and set the time zone to the iPhone’s current time zone. GoSatWatch will first attempt to find a location to within 1000m which is sufficient for most people. Touching the button again will attempt to improve the accuracy. Press stop once the desired location accuracy has been achieved. Although the iPod touch doesn’t have GPS it can still sometimes use WiFi to get a location fix.
GoSatWatch will attempt to determine the location name from GPS coordinates. Tap the location name box to enter a customized name for the location. - Touch [City] to select from a built in list of cities. Selecting a city will automatically update the location name, time zone and coordinates for that city. You can still manually customize the location name.
- Manually enter the location name, time zone, latitude and longitude. The latitude and longitude can be entered in either decimal (e.g. 12.34) or minutes and seconds (e.g. 12 34’ 56”).
Check the world map to ensure the location is set correctly.
Tip: Use [City] to select a city and then use [Current Location] to refine the latitude and longitude for the location within the city.
Settings – About

Displays an about screen with the version number and support information.
Settings – Orbital Elements

Tapping [Orbital Elements] displays a list of satellite sets. Here data sources can be added, removed or modified.

Tap on the delete icon to remove a satellite set.

Tap on “Add new” to add a new satellite set.

Use the reorder controls to rearrange the order shown in the Satellites tab.
GoSatWatch obtains the satellite orbital data from several internet sources published as web pages. GoSatWatch searches through and extracts orbital data from within a specified web page. Each satellite set is associated with a given web page.
Touch an existing set or “Add new” to open and edit the set data source information.
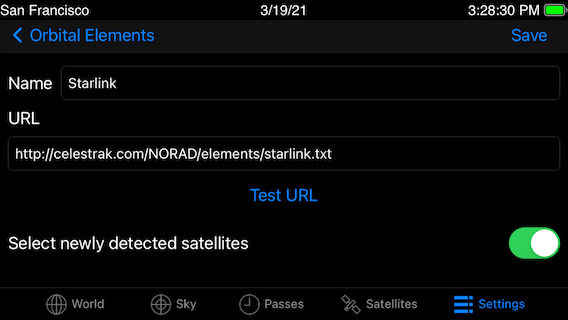
Enter a name and the URL to the orbital data.
Use [Test Url] to check that a connection can be made to the URL and orbital data can be found.
Once verified, touch [Save] and goto the Satellites tab and refresh to load the satellite data.
Adding Satellites
GoSatWatch can be used for any satellite that has Two Line Element (TLE) set data on a web page. Use the Settings – Orbital Elements to add a set with a link to the web page and GoSatWatch will attempt to find and extract the orbital data from it.
GoSatWatch looks for three consecutive lines of TLE data in a web page. One line with the satellite name followed by the two TLE lines. For some web sites GoSatWatch will attempt to find the satellite name from other areas of the web page if only the two TLE lines can be identified.
TLE Web Sites
CelesTrack (celestrak.com)
Contains grouped sets of satellite data available as text files. Enter the links on the Current Data page to track those satellites. For example the link used by GoSatWatch for visible satellites:
http://celestrak.com/NORAD/elements/visual.txt
Heavens Above (www.heavens-above.com)
Requires an account (free) to search the
satellite database. Each satellite has an orbit page with the TLE data.
Use the link to the page with the satellite ID as follows:
http://www.heavens-above.com/orbit.aspx?satid=25544
Real Time Satellite Tracking (www.n2yo.com)
Use the link to the page with the satellite ID as follows:
http://www.n2yo.com/satellite/?s=25544
Google Drive
TLE files can be read from Google Drive. For the files to be read they must be made shareable first to be able to get the share URL.
Safari app: Sign into your Google account at www.google.com and select the Google Drive app. Open the file and tap the “Open in new window” option from the More button. Tap and copy the URL shown at the top of the screen.
Google Drive app: From the file’s options select “Copy link”
Paste the copied URL into the GoSatWatch URL area. Edit the URL to the format shown below where the file ID is the long string of characters between the last two ‘/’s
https://drive.google.com/uc?export=download&id=xxx where xxx is the file ID.